How to Draw A Lamp. Lamps are a typical home appliance that may seem easy but can have many uses. Not only do they help provide light for activities like reading or late-night repairs, but they can also be elegant in their design, allowing them to decorate the space they light.
Also, check our Cat Coloring Pages.
With so many lamp styles to acquire, learning to draw a lamp can be a great way to design your variations. This is the guide to follow if it sounds like something you want to do.
How to Draw A Lamp
Step 1
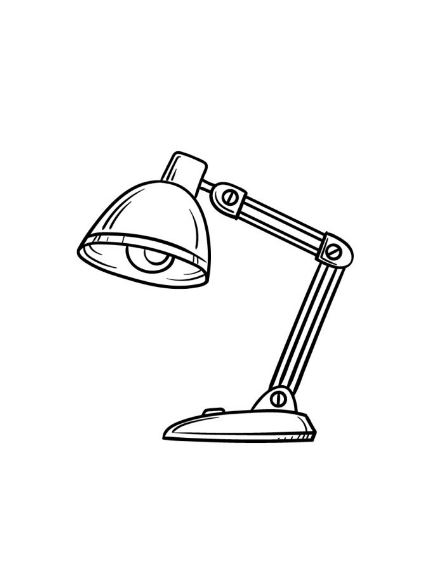
To begin this guide to drawing a lamp, let’s start with the light itself. You can begin by drawing a rounded line for the top of the light liner. So, at the base, you can draw a flat semicircle for the lamp opening.
It wouldn’t be much of a lamp without a bulb to give off some light, so we’ll finish this step by drawing each bulb. You can remove this bulb by pulling another rounded line inside the opening. Once you’re happy with how it looks, we can move on to step 2!
Step 2
Many lamps have an adjustable arm to position it to your liking. In this next step, we will start with the pull arm of your light. First, you can draw a square shape over the lamp head where the component will attach.
From this square shape come two short lines that connect to another condition that is rounded on one side and has a straight edge on the other.
For the last part of this step, you can use a ruler to get perfectly straight lines. Extend a few consecutive lines from the previous shape you drew when you’re done.
Step 3
In this step of our how-to draw a lamp guide, we’ll finalize the arm and base outlines to prepare you for some final details. First, draw another of these shapes with a rounded edge versus a straight edge like you drew in the last part. Then extend two more straight lines with an angel coming down from this shape and going to the base.
The base is relatively simple and can be drawn reasonably flat with a small switch at the top. The area where the base connects to the arm also has one of those rounded shapes. Once you’ve replicated these aspects as they appear in the image, you’re ready for the next step!
Step 4
We will add some finer details to this and the next step of your lamp design. We’re going to focus on the arms first, and while they may look like they’re made out of solid pieces, they are two strands per arm.
To create this effect, add more straight lines parallel to the inside edge of the arm outlines. It looks more complicated than it is, and the reference image shows you how it should look!
Next, add some screws to the arm connectors, adding a small circle with a continuous line to each of these connectors. Finally, you can add some line details to the lamp head, bulb, and base.
Step 5
At this point in our guide to drawing a lamp, you have the entire outline of the completed drawing, so we’re going to finish with some final details now. We have kept these details quite subtle in our example image. You can define the lamp more by adding a few simple line details to all lamp parts.
After adding these line details, feel free to add some of your own! You can change the design and details of the lamp or give it a little more context by drawing a background. By drawing an experience, you could show the desk this lamp is on and draw other objects to accompany it.
Step 6
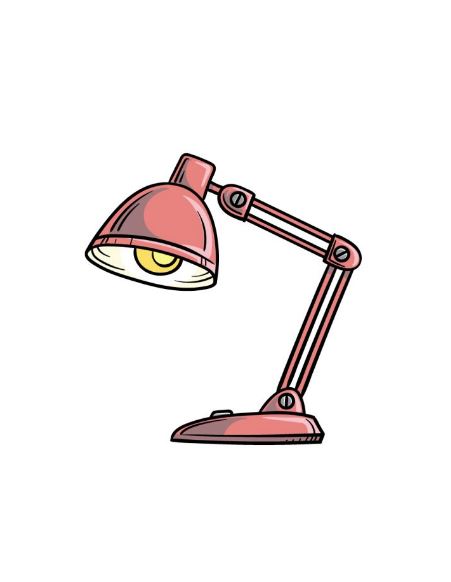
Nothing completes a picture like eye-catching color, and that’s exactly what we add to your lamp design’s final step! In our reference image, we showed you the color scheme we want to use.
These include shades of red and yellow for the lamp and light source, but these colors are our suggestions. If you like the look, you can opt for a similar color scheme or use your unique colors!
Your Lamp Drawing is Finished!

